
It is a very common and frequently emerging issue when you try to print your document, and your Hp printer Not printing Black. Or you have printed something and the quality of that printed document or photo is not as expected. This problem is categorized under streaked or faded printouts, Hp printer Not printing Black, documents with blurred or fuzzy text, ink smears, and other quality issues.
Although, sometimes rough handling at the store or during installation can also cause print quality problems with newly installed ink cartridges apart from the above-mentioned causes. So, to help and support our users who have asked us for the solution to this problem many times, we have put together a list of things you can do when your printer stops printing in black or color. At hp.123printersupport.com, US you will find proven solutions for every HP printer’s technical problem with an experienced team of professionals having years of experience in dealing with gritty issues.
Troubleshooting Steps to Fix HP Printer – Black or Color Ink Not Printing Issue
In this blog, you will learn useful tips to fix your ink not printing issue with your HP printer. Let us proceed with reinstalling the HP printer drivers:
Step 1: Try to Reinstall the Printer Driver (Applicable for Windows System only)
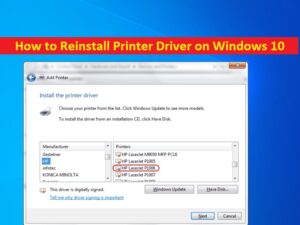
In case you are unable to print in color from a Windows computer, try to uninstall and reinstall the printer software or you may skip this step if your printer is able to print in color.
- From the devices list, remove the printer. To do so, go to “Uninstall HP printer software and drivers”.
- Go to HP Customer Support and select “Software and Driver Downloads”, and then install the latest software for your printer.
After installing the latest software, now try to obtain a printout. If these steps resolved the issue, you do not need to continue troubleshooting. And if the issue remains the same, go to the next step.
Step 2: Genuine HP Ink Cartridges must be used
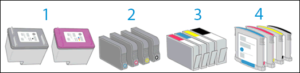
Experts always recommend using genuine HP ink or toner supplies. HP cannot guarantee the quality or reliability of non-HP or refilled cartridges. Using non-genuine HP cartridges, will create more issues and might not be resolved the issue through the steps in this document. You can check the authenticity of your cartridges through links available on hp.123.com.
Make sure you purchase replacement cartridges and other supplies from the HP genuine stores or contact us at hp.123printersupport with a 24/7 hours support and help facility.
If you are using genuine HP ink cartridges and the print quality is unacceptable, continue to the next step to check for ink smears on the back of printouts.
Step 3: Inspect for Ink Smears on the back of Printed Documents
If there are smears of ink on the back of your printouts, you can use an automated tool to resolve the issue. Follow the steps mentioned:
- Make sure the printer is loaded with sufficient plain white paper.
- Go to the printer control panel and swipe the display to the left, and then touch “Setup”.
- Now, go to Tools.
- Swipe up on the display, and then touch “Clean Page Smears”. The printer slowly feeds a blank page.
- Patiently wait for the printer to eject the blank page.
Obtain print. If the print quality is unacceptable, continue to the next step to make sure you are using the appropriate paper for your print job.
Step 4: Use appropriate quality paper for your Print Job
Check and be sure about the paper you are using is appropriate or not for the print job. If it is not as required, reload the printer with an appropriate paper type.
- Load the paper print side down in the input tray. Many papers have printing and nonprinting sides, such as photo paper and envelopes. Usually, the smoother side is the “print side,” and sometimes the non-print side has the logo of the paper manufacturer on it.
- Avoid wrinkled or curled paper. Always use only clean, wrinkle-free paper.
- Make use of the correct paper type for your printing needs.
- Plain paper with ColorLok technology works well for daily printing needs. Paper with ColorLok technology is regarded as industry-standard paper that works well with HP ink.
- Use HP Advanced Photo Paper to obtain the best results with documents having dense printing, such as high contrast graphics or photos.
- Have you noticed that some paper might not absorb ink as well as others? If your prints smear easily, make sure you are using a recommended paper.
- Always keep photo paper in its original packaging inside a resealable plastic bag. Store the paper on a flat surface in a cool, dry place. Load 10-20 sheets of photo paper only when you are ready to print, and then put the unused paper back in the packaging.
- Try using a different paper. This will exhibit if the problem is related to the paper or not.
After checking the paper, try to print again. If the print quality is unacceptable, move towards the next step.
Step 5: Check the Print Settings for Windows and Mac accordingly
Evaluate if your OS might be causing problems. Check the print settings in your operating system to make sure they are appropriate for your print job.
After checking the print settings with your respective OS, try to print again. If the print quality is unacceptable, continue to the next step.
Step 6: Check the estimated Ink Levels
Low ink levels also affect the print quality. So, regularly check the estimated ink levels from the printer control panel.
Go to the printer control panel, and touch the Ink icon to display the current estimated ink levels.
- If none of the ink cartridges are low on ink, you do not need to replace them and directly jump to print a “Print Quality Diagnostic Report”.
2. If any of the ink cartridges are low on ink, immediately replace the ink cartridge.
Step 7: Restore any Empty or Low Ink Cartridges

Follow the steps to replace any low or empty ink cartridges, and then try to obtain print again.
- First of all turn on the printer.
- Load the printer with plain paper.
- Gently grasp the handles on either side of the printer, then raise the ink cartridge access door until it locks into place. Now the carriage moves to the center of the printer.
- Wait until the carriage is idle and silent before you proceed.
- To release the ink cartridge, lift the lid on the ink cartridge slot, then gently push the lid back until it stops.
- Pull out the ink cartridge to remove it from the slot.
- Take out new ink cartridges from its package. Be careful to only touch the black plastic on the ink cartridge.
- Remove the plastic tape from the ink cartridge.
- Hold the ink cartridge by its sides with the nozzles toward the printer, then slide the ink cartridge forward into the slot.
- Now, close the lid on the ink cartridge slot and secure the ink cartridge into place.
- You can repeat the previous steps if you want to install the other ink cartridge.
- Close the ink cartridge access door. When you installed new ink cartridges, the printer automatically prints an alignment page.
- You should wait for the alignment page to be fully released from the printer.
- Then, lift the scanner lid.
- Place the alignment page with the print side down on the scanner glass. Position it according to the engraved guides around the glass.
- Close the scanner lid, then touch OK. You will notice the printer aligns the ink cartridges.
Replacing the ink cartridges must resolve the issue, if required otherwise you can move to the next step to continue troubleshooting.
Step 8: Take a Print Quality Diagnostic Report
Take a print of the Print Quality Diagnostic Report from the printer control panel, to evaluate the results.
- Firstly, load the input tray with plain white paper.
- On the printer control panel, swipe the display to the left, and then touch “Setup”.
- Go to “Tools”.
- Swipe up on the display, and then touch to print “Print Quality Report”.
- Keep the Print Quality Diagnostic report for future reference.
Now, after completion of this step continue to the next step to examine the color blocks on the Print Quality Diagnostic report.
Step 9: Investigate the Color Blocks for Defects
- To make sure that the color blocks do not show white lines and are not faded or missing minutely examine the color blocks on the Print Quality Diagnostic report.
- If the color blocks do not show white lines and are not faded or missing, check for the alignment lines.
- If any of the color blocks show white lines and are faded or missing completely, jump towards the next step to clean the ink cartridges.
Step 10: Clean Ink Cartridges completely
Cleaning the ink cartridges can improve print quality. Clean the ink cartridges from the printer control panel, then evaluate the results.
- Make sure to load the input tray with plain white paper.
- On the printer control panel, swipe the display to the left, then touch “Setup”.
- Click “Tools”, then click “Clean Cartridges”. The printer prints a Print Quality Diagnostic report.
- Examine the print quality on the Print Quality Diagnostic report.
- If the print quality is acceptable, click no.
- If the print quality is unacceptable, click yes when prompted to perform the next level of cleaning.
Move to the next step to examine the alignment lines and green color block on the Print Quality Diagnostic report.
Step 11: Examine the Alignment Lines and Green Color Block for Defects
Examine the alignment lines and green color block on the Print Quality Diagnostic report. Make sure the lines are straight and connected and that there are no dark lines or white gaps in the green color block.
- If you didn’t notice any defects on the Print Quality Diagnostic report, the print mechanism, and ink cartridges are working correctly. If the print quality is having any defects, then you should try these general print-quality guidelines. You do not need to continue the troubleshooting steps in this document.
- Make sure the image you are printing has a high enough resolution. Images that have been enlarged might display fuzzy or blurry.
- If the problem is near the edge of a printout, use the print settings to rotate the image 180 degrees. The problem might not display on the other end of the printout.
- Do not leave unprotected ink cartridges out of the printer for an extended period of time.
- Always use the power button to turn off the printer. This protects the ink cartridges from exposure to air.
- If any of the alignment lines are not straight and connected, or the green color block has dark lines or white gaps, continue to the next step to align the printer.
Step 12: Alignment of Ink Cartridges and Printhead
When ink cartridges are aligned correctly it will align the printhead also. To evaluate the results, align the printer from the printer control panel.
- Load the input tray with plain sheets.
- On the printer control panel, swipe the display to the left, and then touch “Setup”.
- Now, click on “Tools”.
- Swipe up on the display, then click “Align Printer”. To print the alignment page.
- Wait for the alignment page to fully eject from the printer.
- Lift the scanner lid.
- Place the alignment page with the print side down on the scanner glass. Position it according to the engraved guides around the glass.
- Close the scanner lid, then touch OK. The printer aligns the ink cartridges.
- Try to print again.
- If these steps resolved the issue, you can stop troubleshooting.
- If the printout shows track marks or smears, continue to the next step to manually clean the area around the ink nozzles.
- If these steps did not resolve the issue, and the printout does not show track marks or smears, skip to the step to replace the problem ink cartridge.
Step 13: Clean the Ink Nozzles Manually
Unless the printout specifically shows smeared text or track marks then only perform these steps. Clean the area around the ink nozzles if you see track marks or smears on the printouts. Let us see the steps involved:
- Gather the following materials:
- Dry foam-rubber swabs, lint-free cloth, or any soft material that does not come apart or leave fibers.
- Distilled, filtered, or bottled water. Do not use tap water as it might contain contaminants that can damage the ink cartridges.
- Then, turn on the printer.
- Gently grasp the handles on either side of the printer, then raise the ink cartridge access door until it locks into place. The carriage moves to the center of the printer.
- Wait until the carriage is idle and silent before you continue.
- Now disconnect the power cord from the rear of the printer and the USB cable also.
- To release the ink cartridge, lift the lid on the ink cartridge slot, then gently push the lid back until it stops.
- Pull up the ink cartridge to remove it from the slot. To do so first lift the lid and gently push it back & pull up on the ink cartridge.
- Now hold the ink cartridge by its sides tightly.
- Lightly moisten a foam-rubber swab or lint-free cloth with distilled water.
- Clean the face and edges around the ink nozzle with the swab. Remember not to clean the area surrounding the ink nozzle.
- Either let the ink cartridge sit for 10 minutes to allow the cleaned area to dry, or use a new swab to dry it.
- Hold the ink cartridge by its sides with the nozzles toward the printer, then slide the ink cartridge forward into the slot.
- Close the lid on the ink cartridge slot to secure the ink cartridge into place. To do so, first insert the color ink cartridge on the left and the black ink cartridge on the right & close the lid.
- Repeat these steps to clean, then reinsert the other ink cartridge.
- Close the ink cartridge access door.
- Reconnect the power cord to the rear of the printer.
- Turn on the printer, if it does not turn on automatically.
- Analyze the page after taking print finally.
If the print quality is unacceptable, continue to the next step and change the problem ink cartridges.
Step 13: Clean the Ink Nozzles Manually
Unless the printout specifically shows smeared text or track marks then only perform these steps. Clean the area around the ink nozzles if you see track marks or smears on the printouts. Let us see the steps involved:
- Gather the following materials:
- Dry foam-rubber swabs, lint-free cloth, or any soft material that does not come apart or leave fibers.
- Distilled, filtered, or bottled water. Do not use tap water as it might contain contaminants that can damage the ink cartridges.
- Then, turn on the printer.
- Gently grasp the handles on either side of the printer, then raise the ink cartridge access door until it locks into place. The carriage moves to the center of the printer.
- Wait until the carriage is idle and silent before you continue.
- Now disconnect the power cord from the rear of the printer and the USB cable also.
- To release the ink cartridge, lift the lid on the ink cartridge slot, then gently push the lid back until it stops.
- Pull up the ink cartridge to remove it from the slot. To do so first lift the lid and gently push it back & pull up on the ink cartridge.
- Now hold the ink cartridge by its sides tightly.
- Lightly moisten a foam-rubber swab or lint-free cloth with distilled water.
- Clean the face and edges around the ink nozzle with the swab. Remember not to clean the area surrounding the ink nozzle.
- Either let the ink cartridge sit for 10 minutes to allow the cleaned area to dry, or use a new swab to dry it.
- Hold the ink cartridge by its sides with the nozzles toward the printer, then slide the ink cartridge forward into the slot.
- Close the lid on the ink cartridge slot to secure the ink cartridge into place. To do so, first, insert the color ink cartridge on the left and the black ink cartridge on the right & close the lid.
- Repeat these steps to clean, then reinsert the other ink cartridge.
- Close the ink cartridge access door.
- Reconnect the power cord to the rear of the printer.
- Turn on the printer, if it does not turn on automatically.
- Analyze the page after taking print finally.
If the print quality is unacceptable, continue to the next step and change the problem ink cartridges.
Step 14: Change Ink Cartridge creating Problem for Hp printer Not printing Black
When you notice any defects on the printout and all the preceding steps failed to resolve the issue, even if the ink cartridge is not low on ink, replacing the ink cartridge is the last resort. The problem ink cartridge is the one that printed the defects on the Print Quality Diagnostic report as described earlier in this document.
Check defective cartridge or printhead and the warranty period. To check the warranty on your ink or toner supplies, go to printer and page yield overview and then review the limited warranty information for your supplies. Steps involved in replacing the ink or toner:
- First turn on the printer.
- Load the printer with plain sheets.
- Now, grasp the handles gently on either side of the printer to raise the ink cartridge access door until it locks into place. You will notice the carriage moving to the center of the printer.
- Need to wait until the carriage is idle and silent before you proceed.
- To release the ink cartridge, lift the lid on the ink cartridge slot, then gently push the lid back until it stops.
- Now, pull up on the ink cartridge to remove it from the slot. To do so lift the lid and gently push it back and pull up on the ink cartridge.
- Take out one of the new ink cartridges from its package. Be cautious and touch the black plastic on the ink cartridge only.
- And remove the plastic tape from the ink cartridge.
- Hold the ink cartridge by its sides with the nozzles toward the printer, then slide the ink cartridge forward into the slot.
- Close the lid on the ink cartridge slot to secure the ink cartridge into place. To do so, insert the color ink cartridge on the left and the black ink cartridge on the right & close the lid.
- Repeat the previous steps to install the other ink cartridge, if required.
- Close the ink cartridge access door. The printer will automatically prints an alignment page after the installation of newink cartridges.
- Wait for the alignment page to fully release from the printer.
- And, lift the scanner lid.
- Place the alignment page with the print side down on the scanner glass. Position it according to the engraved guides around the glass.
- Close the scanner lid, click OK. The printer aligns the ink cartridges.
Try to take print job again. If the print quality is unacceptable, go to the next step and get your printer to service.
Step 15: Go for Servicing the Printer
After going through all the preceding steps, if the issue remains the same, you should service or replace your HP product.
Go to 123.hp.com/setup to schedule a product repair or replacement.
Final Thoughts
You can now get rid of the “HP Printer Not Printing in Black or Color Ink” issue by following seriously the above-mentioned methods. The above methods are useful in troubleshooting the Printer Not Printing in Black or Color Ink issues. Hopefully, these methods have fixed your problem but, if you are not satisfied with the above methods or face difficulty in carrying out the steps and need some technical assistance, you may also contact HP officials in case, your problem remains the same and you need to contact for professional guidance to fully understand the problem.